
A commercial bathroom can look dry by lunchtime yet remain damp above the ceiling long after the morning shower rush. A ceiling mounted dehumidifier can help control that lingering moisture, provided its capacity, airflow, drainage, and installation location suit the actual building.
For hotels, gyms, staff changing rooms, and shared shower facilities, the useful question is not simply whether a ceiling mounted dehumidifier fits overhead. It is whether the complete installation can remove moisture without disrupting ventilation, creating drainage problems, or making routine servicing difficult.
When a Commercial Bathroom Needs More Than an Extract Fan
Start with the symptoms and their timing. A mirror that briefly fogs during a hot shower is different from a ceiling that stays damp until the next morning. Persistent moisture after normal use deserves investigation, especially when the exhaust system appears to be running.
Repeated shower use can introduce water vapor faster than a small ventilation system removes it. Wet floors, towels, and partitions continue releasing moisture after the showers stop. Where incoming air is already humid, replacing bathroom air may provide less drying than the operator expects.
However, adding equipment before checking the building can be an expensive detour. A leaking pipe, failed waterproofing, blocked extract grille, or cold uninsulated duct needs its own repair. A dehumidifier will not repair these defects, even if the room humidity falls.
- Slow recovery: Humidity stays elevated between shower sessions instead of returning toward the agreed operating range.
- Recurring condensation: Droplets return to cold pipes, ceiling edges, or other surfaces after they have been wiped dry.
- Damp adjacent spaces: Moisture spreads into changing areas or corridors when bathroom doors open.
- Persistent material damage: Paint, sealants, or ceiling finishes deteriorate despite appropriate cleaning and repairs.
Use these observations to define the problem, not to diagnose every stain as condensation. Where concealed materials are wet, inspect the source before enclosing a new system above them.
How Ceiling Mounted Dehumidification Fits the Ventilation System
What Each System Actually Does
A typical refrigerant dehumidifier moves air across a cold coil, collects condensed water, and returns air after reheating it. The room receives drier air and some heat. It does not receive a substitute supply of outdoor air merely because the equipment includes a fan.
Extract ventilation removes bathroom air, including moisture and odors, while replacement air enters through a designed route. Air conditioning primarily controls temperature and removes moisture when its cooling coil operates under suitable conditions. These functions overlap, but their controls and limitations differ.
| Equipment | Main Job | Bathroom Design Consideration |
| Extract fan | Remove bathroom air and support ventilation | Provide an appropriate replacement air path and verify delivered airflow |
| Air conditioner | Remove heat and some moisture during cooling | Cooling demand may end before the bathroom has sufficiently dried |
| Ceiling mounted dehumidifier | Remove water vapor under humidity control | Provide condensate drainage, service access, and a separate ventilation strategy |
The most useful arrangement is often coordinated operation. Exhaust deals with occupied bathroom ventilation, while dedicated dehumidification manages moisture that remains or enters with humid replacement air. The mechanical designer should confirm the ventilation requirements for the particular building and location.
Keep Bathroom Air in the Right Zone
Do not connect bathroom return air to a general office or bedroom supply simply because one unit has enough nominal capacity. Air quality, odor transfer, pressure relationships, and local ventilation requirements determine which spaces can share an air circuit.
A dedicated bathroom or changing room arrangement is easier to assess than an improvised shared return. Show every extract point, transfer opening, and dehumidifier grille on the same drawing. Otherwise, individually reasonable components can work against one another once the doors close.
Measure the Bathroom Before Choosing a Unit
Follow the Shower Schedule
Record conditions during a representative operating day. A gym that fills after evening classes behaves differently from a hotel with a long morning shower period. An afternoon spot reading can miss the very conditions that prompted the purchase.
Log room temperature and humidity before use, during the busiest period, and through recovery. Also note the number of showers running, cleaning times, exhaust operation, and door positions. Include a quieter day so that the controls can be assessed when the moisture load is low.
Place the measuring device where it represents room air. Direct shower spray, a supply jet, a hot light fitting, or an exterior wall can distort the reading. If the space has several shower bays, compare more than one location rather than trusting a single convenient sensor.
Check Relative Humidity and Cold Surfaces
Relative humidity changes with temperature as well as moisture content. If the bathroom warms up, the displayed percentage can fall without an equivalent amount of water leaving the space. Read temperature and humidity together when judging recovery.
Condensation depends on surface temperature too. When a surface is colder than the surrounding air’s dew point, water can collect there. This is why an apparently acceptable room reading does not rule out condensation on an uninsulated cold water pipe.
As general indoor moisture guidance, the US EPA recommends keeping relative humidity below 60% where possible, ideally between 30% and 50%. That residential guidance is a useful reference, not a universal commercial shower room design specification.
Agree the operating target and acceptable recovery period with the project team. They should reflect occupancy, room temperature, vulnerable surfaces, and the ventilation design. Trying to hold an unnecessarily low setting during continuous hot showers can add energy use without resolving a cold surface defect.
Size for Moisture Load, Not Just Floor Area
Two bathrooms with identical floor plans can require very different water removal rates. One may serve occasional handwashing; the other may contain several showers operating together. Ceiling height affects air volume, but volume alone does not describe the ongoing moisture source.
The selection should consider shower use, wet surface evaporation, replacement air, leakage from adjacent areas, and moisture already removed by ventilation or cooling. Avoid counting the same contribution twice. A documented moisture balance is more useful than a blanket allowance per square meter.
Compare Capacity at the Same Conditions
A published liters per day figure belongs to specified inlet conditions. Ask for the test temperature and humidity, then request performance near the bathroom’s intended operating point. A warm, very humid test rating should not be treated as guaranteed output at a cooler, drier target.
For example, suppose a project calculation identifies a remaining moisture load of 1.5 liters per hour during the busy period. That is the rate the proposed system needs to address under those conditions. A label showing 36 liters per day does not automatically prove that requirement is met.
The arithmetic is straightforward; the operating assumptions are not. Capacity changes as room conditions change, and downtime, defrost where applicable, and recovery after a peak all affect the outcome. This example explains the comparison method and is not a sizing recommendation for a specific bathroom.
Allow for Airflow Resistance
Ducts, bends, grilles, and filters resist airflow. A unit capable of moving sufficient air through a short open connection may deliver less through a restrictive ceiling installation. Ask for available external static pressure and the proposed operating airflow together.
Keep supply and return positions far enough apart to avoid immediately drawing freshly dried air back into the machine. Look for stagnant corners behind partitions, but avoid uncomfortable air jets on wet occupants. Final grille selection should consider air distribution and noise together.
Plan Ceiling Space and Service Access
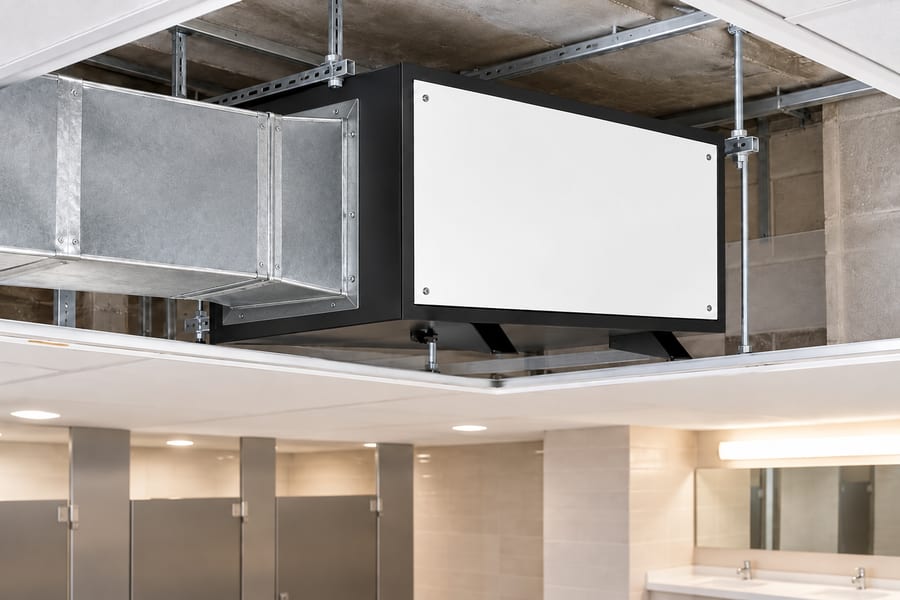
The visible ceiling is not necessarily the structure that can carry the equipment. The support design must account for the unit’s installed mass, vibration, building structure, and access for lifting. Suspended ceiling tiles and decorative framing should not be assumed to provide adequate support.
Measure the complete installation envelope. Cabinet dimensions are only the beginning: duct transitions, insulation, pipe fall, mounting hardware, and removal clearances also occupy space. A machine that fits in a drawing may still be impossible to service through the proposed hatch.
- Dry equipment location: Position the cabinet away from direct spray and confirm the selected equipment is suitable for the actual environment.
- Filter access: Leave room to remove and reinstall the filter without dismantling ducts.
- Service opening: Make important components reachable, including the drain connection and electrical service area.
- Noise control: Coordinate vibration isolation, duct connections, air velocity, and nearby occupied rooms.
- Electrical suitability: Have the installer verify the required supply, protection, isolation, and permitted installation location.
Concealing the cabinet does not by itself make the system quiet or suitable for a wet zone. Where bathroom ceiling conditions are unsuitable, an adjacent dry service area with properly designed ducts may offer a better arrangement.
Before ordering, compare your drawing with the considerations in our ceiling space planning guide. Confirm clearances against the actual selected model rather than transferring dimensions from a similar looking unit.
Design Drainage Before Closing the Ceiling
Overhead condensate is easy to overlook because the quantity appears modest. The consequence of a blocked connection is not modest when water reaches a finished ceiling. Draw the discharge route and confirm a suitable termination before deciding where the cabinet will sit.
Gravity drainage needs a continuous fall consistent with the equipment instructions. If the route rises or lacks sufficient fall, assess an appropriate condensate pump. Verify its capacity and allowable lift at the real pipe route, including fittings, rather than checking only the vertical distance.
Trap and vent arrangements depend on equipment pressure and the connection design. Follow the selected unit’s drainage instructions and applicable plumbing requirements; copying an unrelated installation can cause poor flow or unwanted air movement through the drain.
- Accessible connections: Keep cleaning points and vulnerable joints reachable after the ceiling is finished.
- Overflow response: Specify how a blocked drain or pump fault will be detected and what the equipment should do.
- Condensation protection: Insulate cold surfaces where surrounding moist air could produce external droplets.
- Commissioning test: Observe drainage with the unit operating and test the specified overflow response.
For a more detailed discussion, see our ceiling dehumidifier drainage guide. The accepted installation should include a practical way to clear the drain without cutting open a finished ceiling.
Set Controls Around Real Bathroom Use
A humidity sensor should represent the area being controlled. A sensor inside a return path that mostly receives dry supply air can stop the unit too soon. One positioned beside a shower can keep calling for operation even when the rest of the room has recovered.
Agree how the dehumidifier, exhaust fan, and building controls interact. For example, the bathroom may need ventilation during occupancy and additional drying after the shower period. These operating periods need not be identical, and humidity control should not override required ventilation.
Use sensible control differentials and the manufacturer’s compressor protection settings. Very frequent starts can indicate poor sensor placement, unsuitable settings, or a mismatch between the equipment and the load. Do not assume more switching means more accurate room control.
Make alarms useful to the people running the building. A fault hidden above a ceiling is easy to miss. Where available and appropriate, route high humidity or drainage warnings to an accessible controller or building monitoring system, with a clear response procedure.
Estimate Electricity Use Without Guessing Savings
Compare proposals using their stated electrical input and a realistic operating schedule. A lower purchase price says little about drainage work, electrical installation, access panels, or the hours needed to recover after busy periods. Request these items separately in the quotation.
For an illustrative calculation prepared in September 2026, assume an average input of 0.65 kW during operation and an electricity price of US$0.12 per kWh. At six operating hours per day, consumption would be 3.9 kWh, costing about US$0.47 per day or US$14.04 over 30 days.
At ten hours per day under the same assumptions, the figures become 6.5 kWh, US$0.78 per day, and US$23.40 over 30 days. These are arithmetic examples for international buyers, not WetWells model ratings, measured bathroom results, or a local utility quotation.
The examples exclude installation, maintenance, taxes, and separate ventilation, pumping, heating, or cooling energy. Substitute the proposed equipment’s actual input, your local tariff, and a credible duty cycle. If components run independently, calculate their consumption separately before adding the totals.
Useful energy improvements usually begin with fixing leaks, avoiding unnecessary moisture entry, cleaning filters, and correcting the control sequence. Reducing required exhaust airflow simply to make a dehumidifier run less is not an acceptable substitute for reviewing the full ventilation design.
Commission the System During a Busy Period
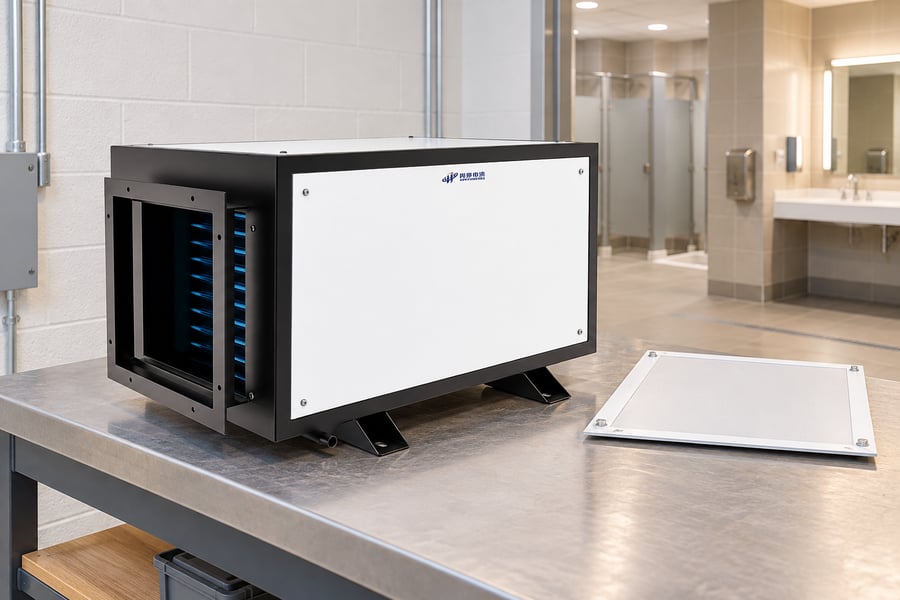
A brief test in an empty, dry bathroom confirms very little about shower operation. Check the installation during representative use, then follow the recovery period. Record room conditions, controls, drain behavior, and any complaints about noise or drafts.
- Verify the installation: Check supports, access, duct connections, electrical identification, and the complete drain route.
- Measure delivered airflow: Confirm the actual supply, return, and extract performance against the design.
- Compare sensors: Check the controller reading against a suitable independent instrument in a representative location.
- Observe recovery: Track how conditions change after the busiest shower period and compare them with the agreed target.
- Test fault handling: Demonstrate the specified drainage alarm, shutdown, or pump response without exposing finishes to water.
- Document handover: Record settings, access instructions, cleaning procedures, and who receives service requests.
Repeat the assessment if usage changes substantially. A gym that adds classes or a hotel that changes cleaning routines may create a different moisture pattern. The original equipment selection remains useful only if its operating assumptions still resemble the building.
Questions Buyers Commonly Ask
Can a Ceiling Mounted Dehumidifier Replace Bathroom Exhaust?
No. Moisture removal and ventilation serve different purposes. A recirculating dehumidifier does not provide outdoor air or remove bathroom contaminants in the same way as a designed exhaust system. Coordinate both functions instead of treating them as interchangeable.
Can the Unit Sit Directly Above a Shower?
Do not assume that ceiling mounting makes any unit suitable above a shower. Suitability depends on exposure, enclosure protection, installation instructions, electrical requirements, and service access. Have the project team approve the location for the selected equipment before construction.
Will It Stop Every Condensation Problem?
Not necessarily. Lowering air moisture can help, but unusually cold surfaces may still need insulation or another building repair. If moisture appears in one isolated spot while room conditions are stable, investigate that location instead of repeatedly lowering the humidity setting.
Prepare a Useful Project Brief for WetWells
WetWells offers ceiling mounted configurations with ducted, concealed, and suspended installation options. For a shared shower facility, choose the layout around peak usage and the space your maintenance team can actually reach. Confirm each requested feature against the proposed model and quotation.
Send a ceiling layout or clear site photographs together with the following information. This gives the selection discussion a practical starting point and helps identify installation constraints before a cabinet size is agreed.
- Bathroom use: Building type, shower quantity, busiest operating periods, and cleaning routine.
- Measured conditions: Temperature and humidity records, recovery behavior, and locations showing condensation.
- Ventilation arrangement: Extract airflow, replacement air source, transfer paths, and nearby rooms.
- Available space: Ceiling void dimensions, structural support locations, access opening, and duct route.
- Utilities and controls: Electrical supply, drainage route, pump requirements, and monitoring expectations.